Sunday, April 20, 2014

A Bag of Taters And Craving To Cure


I love, love, love au gratin potatoes and rarely treat myself. I'm the only one in the house that will eat 'em so I don't bother making them. I've got a ham that needs to get eat'n up and what better thing to go with ham than some good cheesy potatoes! I've got myself a craving. And a big ol' bag of red taters. And I got me some cheese.  I'm gonna treat myself.

When I've made au gratin potatoes in the past I've used the dreaded canned soups. I've been trying my dangdest to quit using those but I've gotta admit, they can come in handy on occasion. I just don't make a habit out of it. But this recipe, I'm proud to say, does not use that awful canned stuff.

So....since this recipe used nothing but wholesome yummy ingredients, all of which I had in my cupboard or refrigerator I gave it a go and haven't looked back since. Mmmmm.... Let's get cookin'....


Steak House Au Gratin Potatoes

2 tablespoon butter

2 tablespoons all-purpose flour
2 cloves garlic, minced
3 large red potatoes, sliced on a mandolin 1/4" thick
1 small onion, sliced 1/4" thick or so
1 cup heavy cream
1/2 cup 2% reduced-fat milk
salt and black pepper to taste
2 cups grated Sharp Cheddar cheese, reserving 1/2 cup to add towards end of cooking

Preheat an oven to 350 degrees F. Grease one 11 x 7 inch baking pan with butter. Layer potatoes and onion evenly in the pan.

In a heavy saucepan, melt butter over medium heat, stir in garlic and cook for 30 seconds. Add flour and whisk together until smooth; continue to whisk and cook for one minute. Reduce heat to low and stir in heavy cream, milk, salt and pepper. Cook over low heat until slightly thickened, about 5 minutes. Add in the 1-1/2 cups cheese (1/2 cup at a time) and stir until melted. Pour cream mixture over the potatoes. Cover with foil.

Bake in the preheated oven for 20 minutes, then remove the foil. Continue baking until the potatoes are easily pierced with a fork, about 40 minutes. Remove potatoes from the oven and sprinkle remaining cheese on top. Return to oven and bake until the cheese is melted and potatoes start to brown, about 10-15 minutes. Allow to cool for 5 minutes before serving. Potatoes will thicken more while cooling.

These are so delicious! I almost ate the whole pan myself. Then I remembered I'd hate myself, so I quit. I will be thankful at lunch tomorrow :)

I found the original recipe at Allrecipes.com and tweaked slightly to my cooking style and to my tastes.

Friday, April 18, 2014

Popcorn and Pretzel Sweet Snack Mix

I love a sweet salty snack and if it has nuts I'm all over it.  If you're a popcorn lover you're gonna love this! This is so easy and tasty you'll have to make more than one batch.

The crunch of fresh popped popcorn combined with the creaminess of sweet white chocolate with a hint of cinnamon, the crunch of toasted almonds, saltiness of crisp pretzels and the sweetness of dried blueberries and cranberries all combined together make this snack out of this world. I found a bag of dried blueberries at Costco and just had to have them. I love them more than raisins. I thought they would go good with this popcorn and I was right! Lets get poppin'.


Popcorn and Pretzel Sweet Snack Mix

4 cups freshly popped plain popcorn
2 cups mini pretzels
1 cup pan roasted sliced or chopped almonds
1/2 cup dried blueberries

1/2 cup dried cranberries
1 (12 oz.) pkg. premium white baking morsels (look for the brands made with real cocoa butter)
1 1/2 teaspoons ground cinnamon

Line a 15" x 10" x  1" baking pan with a sheet of Reynolds(R) Parchment Paper; set aside.

Pour popcorn, pretzels, almonds and dried blueberries and cranberries into large bowl. Discard un-popped popcorn kernels.

Melt white morsels according to package directions. Stir in cinnamon; pour over popcorn and pretzels. Toss to evenly coat.

Spread evenly on parchment lined tray. Refrigerate to harden, about 1 hour. Break apart large pieces. Store in airtight container.


You may just want to make two batches of this. One for you and one to share. Because, trust me, one bite and you'll be hooked! Enjoy!

My twist on a recipe found on Allrecipes.com

Critter's and Cookies - Rolled Sugar Cookies

I promised on my last Who Let That Kitchen Gremlin In? blog post to share the Reynolds® sponsored recipe involving cookies and critters. Well...I kinda fibbed. There really are not critters to talk about unless you count these cute little cookie chicks. Aren't they the cutest little critters you've ever seen? 

I got the chance to work with Reynolds® parchment paper and boy did it sure help in rolling these cookies out. Putting the dough between flour dusted parchment paper and rolling them with a rolling pin was the cat's meow...or should I say the chick's chirp?

Let's get onto the recipe -


Rolled Sugar Cookies

Reynolds® Parchment Paper
2 cups all-purpose flour
1 1/2 teaspoons baking powder
1/4 teaspoon salt
1 cup unsalted butter, softened
3/4 cup sugar
2 large egg yolks
1 teaspoon vanilla extract

Combine flour, baking powder and salt in large bowl; set aside.

Beat butter and sugar with electric mixer until fluffy, about 3 minutes. Beat in egg yolks and vanilla. Gradually add flour mixture and combine.

Wrap dough in parchment paper and place in zip style bag; refrigerate until chilled, about 1 hour.

Preheat oven to 350 degrees F. Line cookie sheets with Reynolds(R) Parchment Paper; set aside.

Roll out dough 1/8" thick between 2 lightly floured sheets of parchment paper. Cut dough with 2" cookie cutters. Place dough on parchment-lined cookie sheets.

Bake 6 to 8 minutes or until cookies are lightly browned on edges. Slide parchment paper with cookies onto cooling rack; cool.

Decorate as desired. I used the Royal Icing recipe below.

Royal Icing

3 tablespoons Meringue Powder
4 cups confectioners' sugar approx. 1 lb. box)

6 tablespoons warm water

Beat all ingredients with a hand mixer on high speed until icing forms peaks, approx. 10 minutes.

Tint with your favorite food coloring. 

No live critters were hurt during the making of these cookies. 

The original cookie recipe can be found on Allrecipes.com 

Sunday, April 13, 2014

Who Let That Kitchen Gremlin In?

When I cook or bake sometimes I put my all into it. What I mean by my all is all my dishes, all my utensils and all the pots and pans I own.

I'll look around my kitchen when I'm done & wonder what gremlin made this mess and who let him in. Then I start looking for the kitchen fairy I am certain must have slipped in behind that little gremlin and is waiting in the wings to clean up his mess.

Unfortunately that gremlin and kitchen fairy is me ... all me! Talk about wearing many hats in the family!

For those who know me know that I love to take pictures of my food. All the food on this blog are made and photographed by yours truly. What you don't know about is what kitchen messes I shove aside to find a clean spot in order to photograph that yummy dish after I'm done cooking. It's a sickness I tell ya. But a good sickness.

Many times, to help ease the stress of messy cleanups, I will turn to Reynolds products. 


One of my all time favorites is their parchment paper. I turn to parchment for many uses. Here are some of the ways I've put it to use - 

I've experimented with making a pizza using cauliflower for the crust . The parchment paper worked great allowing me to form my crust right on my baking sheet. Um...this is half of a pizza - the other half is history. Yum!


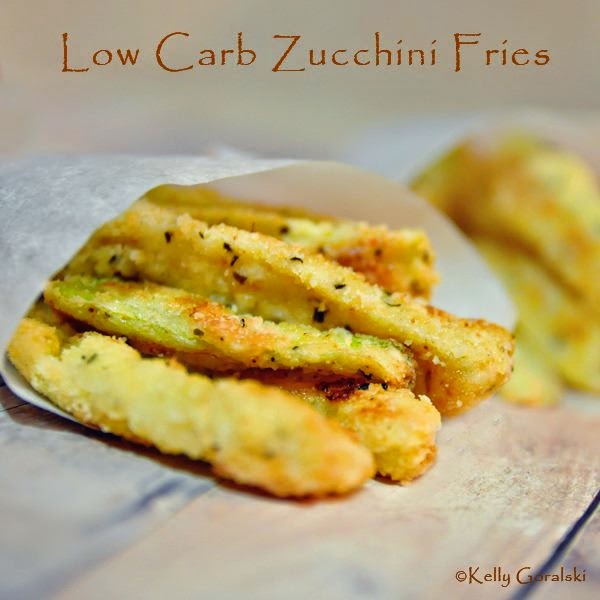
Just form parchment paper into a cone and it makes a neat fry holder for my zucchini fries.  These are baked and not fried and use almond flour. I DO try to eat healthy occasionally. Notice I put the zucchini and the cauliflower before the fattening...er yummy stuff!


Using parchment paper allowed me to not have to look for my napkins to put under my cookies ;)  This recipe will be featured in a future post. So yummy!


And it made for some interesting entertainment while I watched my hubby craft a nice parchment paper sack for this project. I said "Honey, I need something creative for this popcorn photo I want to take. Can you make me a bag?" His response - "Sure darling, I'm on it!" He did great! Can you even buy a parchment bag?

But a fun idea I had for using parchment paper came when I was working on a project for Zappos and Allrecipes. I needed to prepare, photograph and review a recipe for Jell-O Fruit Tarts. I always try to think of creative ways to photograph my food. Racking my brain for ideas, I remembered how the paper in my cauliflower pizza experiment had browned in the oven. Aha! So......

Jell-O Patriotic Mini Fruit Tarts
I baked some parchment paper in a hot oven until it turned brown. Tore it into pieces and here we have a creative way to use parchment paper! But just so you know, baked parchment paper does not taste good. 

So needless to say I find many uses for parchment paper and 

 Click on their logo to go to ReynoldsKichens.com

 I dearly love Reynolds products. I also use their non-stick foil which is a dream, slow-cooker bags, turkey oven bags, wax paper and baking cups. 

So even when that kitchen gremlin makes his appearance and the kitchen fairy is nowhere to be found, I can always count on Reynolds products to help make clean-up a breeze!


I'll be sure to share a recipe that Reynold's sponsored in a future post. Stay tuned .... it involves the cookies above and critters.

Check out more delicious recipes on the  Reynold's  website or their facebook page Reynold's Kitchen.

I participated in a campaign on behalf of Reynolds Kitchens. I received a sample to facilitate my review as well as a promotional item as a thank-you for participating.


#AllstarsReynolds  #MealMagic


Thursday, March 13, 2014

Not Your Traditional Carnitas


Wow, eating healthy has never been so delicious. I love preparing my meals at home. Nothing beats a homemade meal. Not only do you have control over the ingredients but it tastes so much better and you get the satisfaction of knowing you are doing your best at leading a healthy lifestyle. 

In my last post I mentioned working with Mazola® and agreeing to prepare and review their recipes. They sent along product as well as a token of thank you in exchange for an honest review.  As promised, here is recipe #2 in that series. 
Pork Carnitas with Tomatillo Salsa
Servings: 4 
Yield: 4 servings
1 pound pork shoulder
2 tablespoons Mazola® Corn Oil
1/2 teaspoon onion powder
1/2 teaspoon garlic powder
1 tablespoon chili powder
1/4 teaspoon Chipotle peppers in Adobe sauce 
2 tomatillos, finely chopped
1/2 cup tomatoes, finely chopped
1/4 cup coarsely chopped parsley
4 flour tortillas

Combine chopped tomatillos, tomatoes and parsley in a small bowl. Refrigerate until ready to use.

Cut pork into 1 inch cubes; season with salt and pepper. 

Heat oil in large skillet or Dutch oven. Add pork, onion powder, garlic powder, chili powder and chipotle peppers in adobe sauce (the original recipe called for 1/4 tsp Chipotle chili powder which I didn't have - this sauce worked great); saute 3 to 5 minutes to brown the meat.

Add enough water to barely cover pork. Bring to a boil; cover, reduce heat and simmer 30 minutes. Remove lid and continue to simmer an additional 45 minutes or until liquid has evaporated.

Place an equal amount of pork on each tortilla. Top with tomatillo salsa. Garnish with shredded cheese and sour cream if desired.

Enjoy!

The carnitas took more time than I realized, because I didn't pay attention to detail, but was worth the wait. Preparing this ahead would make an easy weeknight meal for those busy days. They're definitely not your traditional carnitas but so yummy nonetheless.
Click here to see the recipe that inspired my version

Another easy, delicious and nutritious dish that's sure to be a part of my menu rotation. 

Give it a try. You won't regret it!

If you are interested in reading more about Mazola® Corn Oil click here.
 

Want more tasty recipes from Mazola®? Find them here.


Wednesday, March 12, 2014

Spring Cleaning and Healthy Eatin'


After the long cold hard winter we're hopefully about to come out of, I am so ready for some sunshine, warmer days and lighter fare. Spring is just a few short days away (on the calendar at least) which leads me to thinking about gardens, campfires, picnics, and easy delicious and healthy meals packed with nutrition. Spring is not only time to clean out our closets and wash our windows, it's also time to clean out our pantries of all the comforts of winter so we can ditch our yoga pants and don our bikinis!

I am a sucker for health and nutrition information, especially when it relates to food and cooking, so I frequent my local library as well as the internet to feed my addiction. However, I am often left scratching my head after learning what I had trusted for years has been replaced with new research. So, I don't pretend to have all the answers. I just try to stick with what I do know. And I do know how to cook....with wholesome ingredients. 


Which brings me to today's recipe which fit perfectly into a healthy lifestyle. The recipe I am featuring today was sponsored by Mazola®. 
You see, Mazola® got wind of the fact that I enjoy cooking and enjoy reviewing recipes so they sent me a bottle of Mazola® Corn Oil as well as a promotional item in exchange for preparing two of their recipes and giving my honest feedback. 

The first recipe I'm sharing with you today is my version of their salmon dish that was so quick and easy and loaded with flavor that I can't wait to make it again. A perfect recipe to compliment any new healthy lifestyle.


Sweet and Spicy Salmon with Orange Salsa

Sweet and Spicy Rub:
1 1/2 teaspoons paprika
1 teaspoon onion powder
1 teaspoon garlic powder
1/4 teaspoon salt
1/4 teaspoon oregano
1/4 teaspoon thyme
1/4 teaspoon finely ground black pepper
Dash of cayenne pepper
1 1/2 teaspoons brown sugar
1 pound salmon fillet
2 teaspoons Mazola(R) Corn Oil


Orange Salsa:
2 cups orange sections, trimmed and diced (insides only)
1/3 cup chopped green onion
1/4 cup chopped red bell pepper
1/4 cup chopped fresh parsley
1 jalapeno pepper, diced


Preheat oven to 375 degrees F.
Combine all salsa ingredients and refrigerate until ready to serve.
Combine paprika, onion and garlic powder, salt, oregano, thyme, black pepper, cayenne pepper and brown sugar in a small bowl.
Cut salmon into 4 portions and brush with oil.
Distribute the rub over the salmon generously coating all surfaces.
Place salmon on a shallow baking pan with sides.
Bake for 15 to 20 minutes, until fish flakes easily.

Top salmon with salsa.

Enjoy!


Great served with a side of orzo and steamed asparagus, this salmon was quick and delicious and very light and filling. And ready in about 30 minutes. Who doesn't love a fast healthy meal. Gives us more time to enjoy our warmer days!! This could easily be grilled on those hot days when you don't want to run the oven.

Click here to see the recipe that inspired my version.

Won't you give this recipe a try? Easy, Delicious and nutritious and a great dish to add to your healthy menu. It can't get better than that!

Stay tuned for my next post of another delicious recipe inspired by Mazola®.

If you are interested in reading more about Mazola® Corn Oil click here.
 

Want more tasty recipes from Mazola®? Find them here.


Tuesday, March 11, 2014

The Magic of Comfort Food

Do you ever find yourself away from home mentally going through your cupboards, refrigerator and freezer wondering what's hiding in the deepest darkest places that would be good for dinner? I do...all the time! I'm always looking for the "wow" ingredient that will help me transform dinner into something magical. 

This time my daydreams sent me on a magical journey of comfort food. Ok, it wasn't that magical but at least I knew I had all the ingredients on hand to pull it off. Ground beef, check. Macaroni, check. Tomatoes, check. Seasonings, check. Parmesan cheese, check.

Everything I need for some American Classic Goulash. Now I don't eat pasta a lot, actually very rarely, but sometimes I just get this craving and need to get my carb fix. I prefer spaghetti, but I had to feed my husband and he WILL NOT touch spaghetti with a ten foot pole. So I'm happy I can get him to eat goulash.  So let's get on to my version of the infamous recipe.


American Classic Goulash

Servings: 4
Yield: 4 servings


1 pound lean ground beef
1/2 onion,  chopped 

2 cloves garlic, chopped or minced
1 cup water
1 (15 ounce) can tomato sauce
2 cups canned stewed or crushed tomatoes
1-1/2 tablespoons Worcestershire sauce
1 tablespoons dried Italian herb seasoning
1 teaspoon dried basil
2 bay leaves
1/2 teaspoon seasoned salt, or to taste
1-1/2 to 2 cups uncooked elbow macaroni
Freshly grated Parmesan cheese, to taste


In a deep frying pan, cook and stir the ground beef, chopped onion (or grated on a fine grater for those onion haters in your life) and garlic over medium-high heat, breaking the meat up as it cooks, until the meat is no longer pink and has started to brown, about 10 minutes. Skim off excess fat.

Add water, tomato sauce, stewed tomatoes, Worcestershire sauce, Italian seasoning, bay leaves, and seasoned salt to the ground beef mixture. Bring the mixture to a boil over medium heat. Reduce the heat to low and simmer 20 minutes, stirring occasionally.

While sauce is simmering, bring 2 quarts of water to a boil. Stir in the macaroni and cook until al dente, about 6-7 minutes depending on brand. Remove from heat and drain.

Once sauce is done simmering discard bay leaves and add macaroni (I made it with 2 cups of macaroni and it wasn't too saucy - for a saucier goulash cook 1-1/2 cups). Stir until combined. Sprinkle with Parmesan cheese. Enjoy.


So can comfort food be magical? I don't know, but I do now it's pure deliciousness! 

I found the original recipe on Allrecipes but changed things up a bit to suit our tastes. Click here to view the recipe that inspired my version.

Try it. You'll like it!